
Step-by-step Storyline Guide: How to Limit Progress Within Narrated eLearning Course
Creating e-learning with accompanying voice-over is something we are seeing more and more frequently with our clients, especially when delivering compliance training. In this article, I will outline a simple step-by-step process for building a slide in Articulate Storyline that forces the learner to listen to the audio on the first visit but provides free navigation if they are revisiting the slide.
One of the most common requests from those clients for whom we’re building e-learning with voice-over, is that they want to force the learner to listen to the audio within a slide before being able to click the next button.
However, when the learner revisits the slide for a second time, they should not be forced to listen to the audio again. Thus allowing free navigation throughout the course once they have completed each slide.
Devil’s Advocate
It could very easily be argued that forcing a learner to listen to audio is an ineffective way to deliver e-learning, and to a certain extent I would agree.
If you want to give the learner responsibility to navigate the course and dig out the information that they think will be useful for them, then locking down the slides so they have to listen to the duration of each can be a bad idea.
The Exception
But there are certain situations where forcing a learner to listen to the audio for each slide is useful, one example I can think of is compliance training.
Within this form of e-learning, it is essential that the course administrator knows that the learner has completed the training, which means the company will be compliant.
The Process
There is a simple process you can follow to create limitations on the navigation within your e-learning course built in Articulate Storyline. What follows is a step-by-step guide on how to do this.
Setup the Slide
To begin this procedure, you will need to open Articulate Storyline.
Let’s assume you are looking at a slide which already has an audio clip containing narration Inserted. You will also need a next button.
We can always use the built-in back and next buttons in Storyline, however if you have seen any e-learning designs – we always like to use custom designed buttons. The same principles apply, however the execution varies slightly depending on which method you use.
For the purpose of this exercise, I’m going to use custom designed buttons.
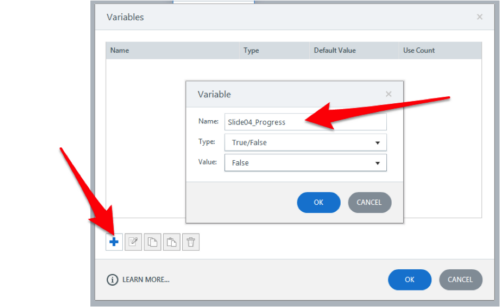
Step 1) Create variable
The first step is to create a simple variable for each slide upon which you plan to force the learner to listen to the audio until completion.
I usually name these variables with a reference to the slide number so you can quickly find it again in future.
- Click the variable button on the Triggers pane
- Click the Add Variable button.
- Give the variable a name
I always name the variable with the slide number and something obvious – I use the word ‘progress’ so I can differentiate this variable from any others on the slide.
- Choose a True/False variable
- Change the default setting to False
This is important because when the learner arrives at the slide, we want the variable to be False.
You won’t see anything change on the slide, but you have set up the variable in the background.
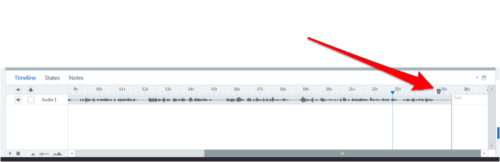
Step 2) Add Cue Point at the end of the slide
Next job is to add a Cue Point onto your timeline. This is a better way than using the a trigger that activates at the end of the timeline, because it enables you to drag the Cue Point along the timeline and any trigger that refers to that Cue Point will still work.
- Click somewhere on the timeline c
- Tap the letter C on the keyboard.
You will see a small triangle appear which a Cue Point. This Cue Point is going to be the reference that we use to adjust our variable
Step 3) Adjust variable to True when Timeline reaches Cue Point #1
Our next job is to create a trigger that changes when the timeline reaches the key point we created in the previous step.
- Click New Trigger
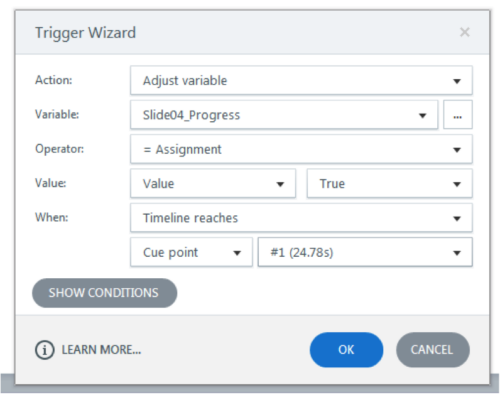
This will bring up the trigger wizard. Adjust the settings based on the image below:
- Change Action to ‘Adjust Variable’
- Choose the variable we created in Step 1
- Operator should be set to =Assignment
- Change Value from Variable to ‘Value’ and ‘True’
- When should be adjusted to ‘Timelines Reaches’ ‘Cue Point’ and ‘#1’
Step 4) Change default button state to Disabled
Obviously we need a button on our slide, which will be disabled when the slide begins for the first time. The idea is that this button changes from disabled to normal after the learner has viewed the slide for the first time only.
- Select Next button
- Click ‘States’ (at the bottom next to Timeline)
- Click ‘Edit States’
At this point we need to add a disabled state, and then we will change the state of that button to a different colour which shows a Disabled state, so that is obvious to the learner.
- Click New State (shown by white paper in States menu)
- Choose ‘Disabled’ from menu
- Click ‘Add’
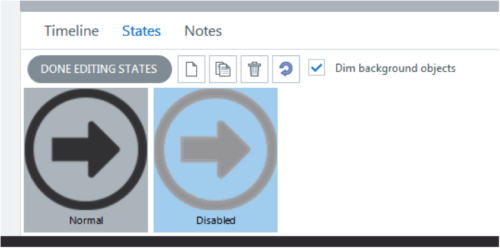
I usually make my disabled state a black-and-white version of the colour button, and also increase the brightness and contrast so it is obviously not clickable.
- Change state of button by adjusting colour/brightness etc
- Click ‘Done Editing States’
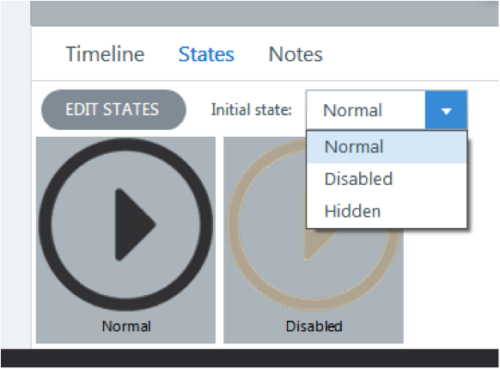
The final step in this process is to ensure that you make the default state for that button disabled. This is really important, because when the learner arrives at the slide, we want to ensure that the button is not clickable.
- Click Initial State dropdown
- Change to ‘Disabled’
Step 5) Change state of Next button to normal when Timeline reaches Cue Point 1
Now we have correctly set up the slide, we now need to create a trigger that changes the state of the Next button to normal when the timeline reaches Cue Point 1. This will enable the learner to click on the next button at any point after this Cue Point (i.e. only at the end of the slide)
- Click new trigger
This will bring up the trigger wizard. Adjust the settings based on the image below:
- Change Action to ‘Change State of’
- On Object ‘Next Button’ (or whatever your button is called)
- To State ‘Normal’
- When ‘Timeline reaches’
- Object ‘Cue point’ and in the second box select the Cue Point ‘#1’
So this means that the Next button will change to Normal when the timeline reaches the Cue Point.
Step 6) Add trigger to change the state of next button
The next part of the process can be confusing. The reason for this is that when the timeline starts on the second visit to the slide, we want to ensure that the next button can be clicked.
So we need to add a trigger to change the state of the next button to ‘Normal’ when Timeline starts – but only if the slide has already been visited i.e. if the variable equals true.
- Add New trigger
- Set Action to ‘Change State of’
- On Object ‘Next button’ (or whatever your button is named)
- To State ‘Normal’
- when Timeline starts
- Object ‘1.1 Current slide’ (depending on what your slide is called!)
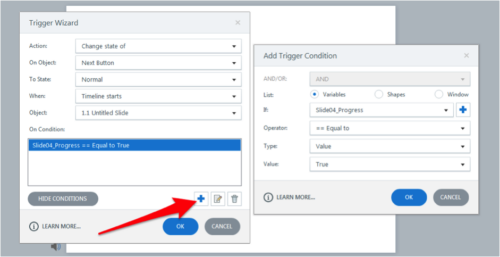
Once you have these settings correctly configured, you will need to add a condition as shown in the image.
- Click ‘Show Conditions’
- Click blue cross
- List Variables
- If Slide04_Progress (or whatever your variable is called)
- Operator ‘Equal to’
- Type ‘Value’
- Value ‘True’
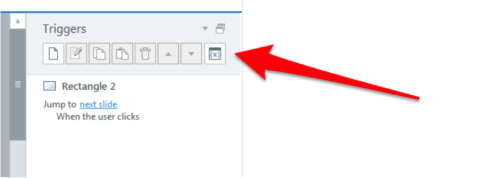
Step 7) Add trigger to Next button
The final step is to create a trigger that jumps to the next slide when the next button is clicked.
- Add New trigger
- Set Action to ‘Jump to slide’
- Slide ‘Next Slide’ (or any other slide you want to link to)
- When User Clicks
- Object ‘Next button’ (or whatever your next button is called)
Because we have set the button to change from disabled to normal, we do not need to add any conditions to this last step.
And that’s it! You’re all set!
The Bonus tip
Once you have set up all of these conditions within your slide, you can quickly duplicate the slide several times and adjust the variables and conditions on each slide.
This will be a much quicker way of setting this rule throughout your whole course, rather than having to follow each of these instructions for every slide individually.
Conclusion
As with anything in Articulate Storyline, there are always several different ways of achieving the same result. I’m sure this is the case for what I have shared here, I would be keen to hear if there are any quicker ways of doing this! Please share in the comments below.