
The Art of Training: Virtual Training Success – Part 1
When it comes to the “The Art of Training”, our first thought is almost always “The Art of Face-to-Face Training”. In this post, let’s move past face to face to virtual. Yep, those dreaded webinars. The place where PowerPoints go to die. As the move to more virtual training becomes a necessity of the workplace, being able to conduct a relevant and engaging virtual course becomes critical.
More so than any other medium, virtual training requires a strong facilitator and careful attention to design. You cannot fall back on classroom antics or play a game of musical chairs to wake people up if you have put them to sleep. Many trainers are scared of webinars. With good reason – they are scary, can be hard to manage, it can be difficult to provide engagement and it is harder to capture people’s attention. Virtual training is truly a unique animal and deserves special attention. This post is the first of two parts that will break down effective virtual learning tips by covering some best practices. Part 2 will cover how to engage your audience. #LetsDoThis!
First, let’s talk about your biggest challenge: You. I know, sometimes it’s hard to get excited about yet another webinar about compliance. However, let’s be real – if you are not pumped up, neither will your audience. If you have the attitude of “let’s get through this.” Your audience has already left you and is checking their email box. Your virtual training is only as good as your training design. This is where the hard work starts. Too often, I hear that virtual training is not effective, to be honest – it’s not the training’s fault it’s not effective, it’s the lack of proper creation and implementation of the program that’s to blame. So now that you are jazzed about your program, and the energy is there – let’s get down to it.
Step 1 – Planning & practice
Planning! A webinar is not the place to talk about the history of time. YAWN! This is the time to ensure relevancy. The virtual environment has a greater expectation for participants to learn something immediately applicable to the job. If your webinar is knowledge dump, consider creating a video rather than dragging people to listen in on a webinar (where, let’s face it – they won’t be listening anyway). Be sure the time is purposeful. Then it’s time to strip down to the basics. You don’t want to have people on the line for any longer than need be. Now, write a script. Yep, a script. Not a robotic script, one with personality and yet will help you to stay on track, remind you of activities, and help you to prompt for learning exchange.
Practice! Too often we get on the screen and THEN try to figure out what all the buttons do, figure out the audio, trouble shoot the tech. Plan a practice sessions. Have people call in remotely and practice the technology. We have a responsibility to model behaviors and in this case, it’s about appearing to look like we know what we’re doing. We only get there by truly understanding the tools we use and how they work. This takes practice.
Step 2 – Set expectations & hold to them
Send out the expectations of the webinar ahead of time. This alerts people to the fact that there will be something happening – and it’s not going to be a PowerPoint turner. This could be in the form of a short video attached to an email. See below, I produced this while writing this post on my iPad. It doesn’t have to be Spielberg. Just a couple of minutes of setting the expectations. This way everyone knows what’s involved. Here are other video tips you might find useful.
Sample Expectations Video:
Always personally write out the process of “How to Join the Call”. I find the auto instructions sent to people, via the webinar platform, could be confusing and not particularly user-friendly. You can edit the instructions before they are emailed to the masses. Only include the instructions they are going to need, delete the rest. Create a quickie, reusable job aid with screen shots and troubleshooting tips. Then insert your expectations video.
Be clear and direct. “It would be great if everyone were on time…”doesn’t quite lay the foundation. This is not the time to be the super nice training person. Be firm in the expectations. “The expectation is that everyone will show up and be logged in at 9:00 am sharp. This is to respect the busy schedules of others.” Then, be a person of your word. Start at 9 am. Don’t you hate when the facilitator says, “Let’s just wait a few more minutes for those late comers.” Me too. You busted yourself to get there on time and now the call is being held up for those who didn’t? Not cool.
Be sure your announcement, video or otherwise – carries the appropriate tone. Be excited, serious, or fun. Choose your emotion. Then convey that emotion. That’s what people will bring with them to the virtual setting. If your email was boring, they will expect to be bored. The attendants are a reflection of you.
Step 3 – Create a Comfortable Environment
Remember, not everyone is comfortable in this type of learning environment. Just as you had to practice, so do others. Consider inviting people to join the webinar 10 minutes early so they can practice with the tools before the session goes live. This is also an opportunity for you to “live check” your audio and visuals. Allow people to play with the annotation tools, have them practice “writing” on the white board or using the chat feature. You do this by setting a warm up question on the screen. Have a slide ready to go that states an icebreaker question:
- In the chat box: Type all the places you have lived – which one was your favorite?
- Click on the pointer (it looks like a little arrow) and then click on the US map on the screen to indicate where you live now.
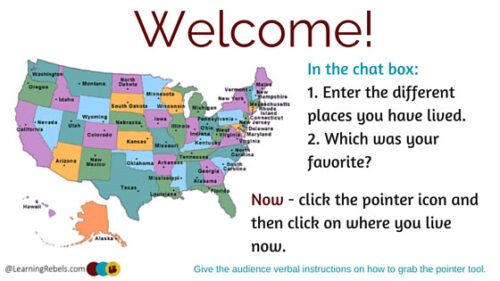
Specificity is your friend in a virtual environment. Tell people exactly what you want them to do and how you want them to do it. This provides comfort to people who are unsure, and may not feel comfortable asking questions. When you do this type of icebreaker BEFORE the session starts, you can guide people as to how to find the pointer or how to use the chat feature.
Clarity in directions and questions is key. In a face-to-face classroom environment, a facilitator might say, “I want to hear what you think about why this issue is important.” In a virtual learning environment, the facilitator needs to say, “I would like to hear from Peter, Paul, and Mary about why you feel this topic is important.” In the classroom, social pressure will encourage people to respond; in the virtual world, directions need to be more specific.
Critical to clear questions, is the need to be patient. Be sure to allow people to process your question and think about an answer, – the added element to this – is allowing people the time to type. You will need to build in pause time to allow for people to type in an answer. Answers to questions do not come in the same rapid format expected in a classroom. People have to process thought and then type. If participants feel rushed, they will not answer.
As mentioned earlier, virtual training requires a strong facilitator and careful attention to design. We can use virtual learning technology in innovative ways. As resources and to stimulate a learning culture that reaches beyond your typical classroom. So shed the fear, and lets’ get started creating virtual training that is engaging, enjoyable and relevant.
Stay tuned for part 2 – Tips for Engaging Your Virtual Audience.